

Measure Base Weight First: 30 Day Plan to Trim Your Pack for Hikers

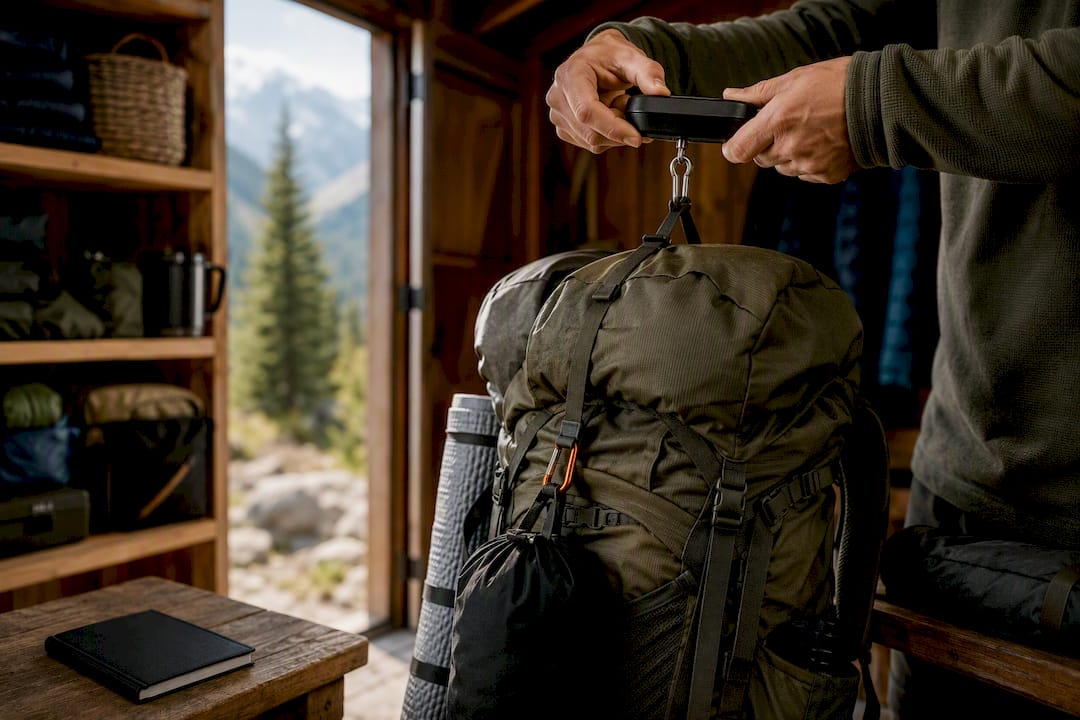
Base weight is the weight of everything in your pack except what you’ll eat, drink, or burn: no food, no water, no fuel. It’s the one number that stays constant no matter how long your trip runs, which is why it’s the metric serious hikers actually track. Weigh your gear now, before you read another word about ultralight tents or titanium stakes, because that single baseline tells you more than any gear review ever will.
TL;DR:
Most hikers should focus on reducing their pack’s base weight by prioritizing improvements to the pack, shelter, and sleep system, which often make up the majority of total weight.
Accurate, item-by-item weighing of all gear is essential for meaningful weight reductions and should be done regularly, especially after gear swaps or updates.
Staying within a 12 to 15 pound base weight is realistic for most three-season trips; higher weights typically include comfort features, while ultralight aims for under 10 pounds.
Reducing weight by switching to lighter gear only makes sense when the item constitutes a significant percentage of your total base weight, ideally 25% or more.
Always balance weight savings with safety; avoid removing essential safety or emergency items and test lighter gear arrangements before committing to longer, remote trips.
Table of Contents
What Counts Toward Base Weight (and What Doesn’t)
Base weight covers every item you carry that doesn’t get consumed along the way. That includes the pack itself, your shelter, sleeping bag or quilt, sleeping pad, cooking hardware, clothing you’re carrying but not wearing, electronics, first-aid supplies, navigation tools, a headlamp, and repair items.
Food, water, and fuel don’t count. Neither does clothing you’re actually wearing at the trailhead, by most conventions, though some hikers include it separately as “worn weight” to keep their total honest. The logic is simple: base weight is a fixed metric meant for comparing gear systems across different trips, and consumables change with trip length, resupply access, and weather, so they’d throw off any apples-to-apples comparison.
A few edge cases trip people up constantly:
Empty fuel canisters and water reservoirs count toward base weight. The container is gear; only what’s inside it is consumable.
Trekking poles count if you carry them in your pack for any stretch, even if you use them most of the time. If they never leave your hands, some hikers exclude them, but consistency matters more than the rule you pick.
Stuff sacks and dry bags count. They’re gear, not packaging.
Repair kits and spare parts count, since they ride in your pack the whole trip regardless of whether you use them.
Pick a rule for each edge case and stick with it every time you weigh your kit. The number is only useful if it’s calculated the same way trip after trip.
How to Calculate Your Base Weight (Step by Step)
Skip the guesswork and put every item on a scale. It takes less than an hour and it’s the only way to know where your weight is actually going.
Lay out every non-consumable item you plan to carry, from your pack down to your spare shoelace.
Weigh each item individually using a kitchen scale for small gear and a luggage or postal scale for bulkier pieces like your pack or tent.
Record every weight in ounces, then convert the total to pounds once everything is logged.
Log items in a spreadsheet or LighterPack, a free tool built specifically for this that auto-totals your list and lets you compare versions over time.
Include stuff sacks, empty containers, and your pack itself in the individual weigh-in, not as an afterthought lumped into “misc.”
Run this exercise again after any gear swap. A simple item-by-item spreadsheet shows you exactly which change moved the needle and by how much, instead of leaving you guessing whether that new sleeping bag actually helped.
Pro Tip: Weigh your pack empty first, then weigh it loaded. The difference isn’t just “gear weight.” It also tells you how much the pack itself is costing you, which matters when you’re deciding whether to replace it.
What Counts as a Good Base Weight? Tiers and Targets
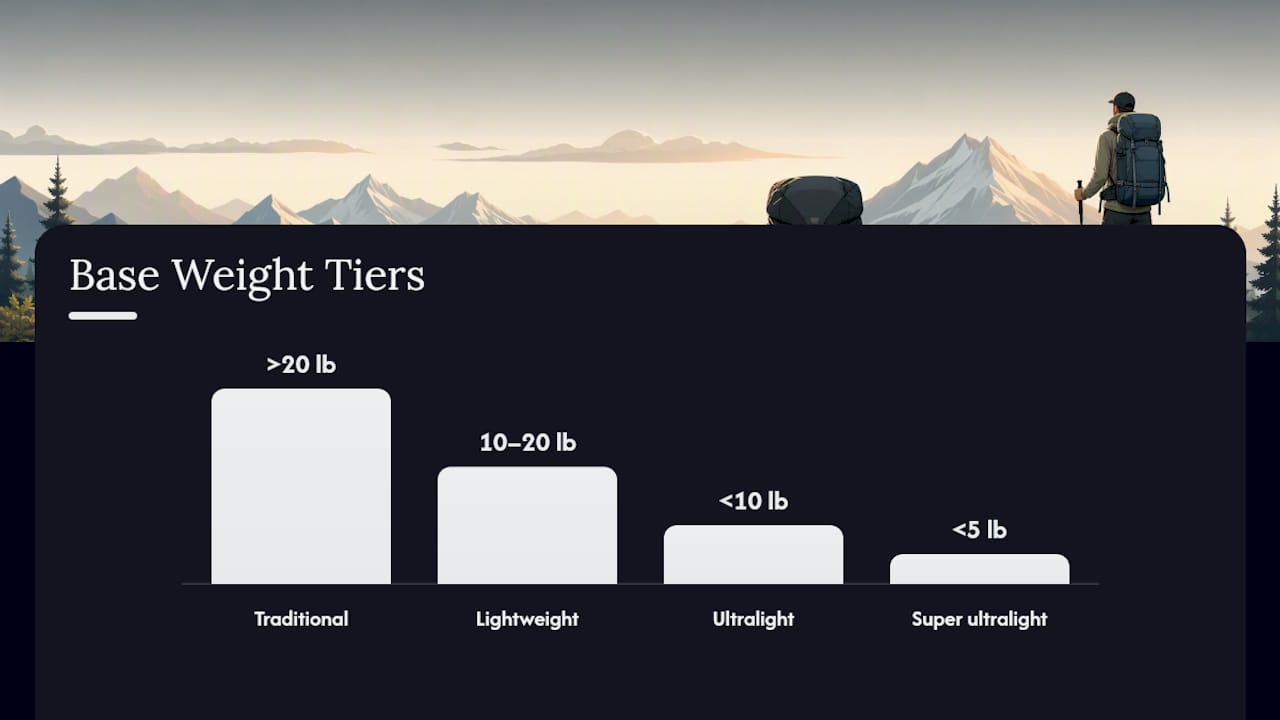
Base weight varies wildly by hiker, trip length, and season, but the backpacking community has settled on rough tiers that make comparison easier. Most hikers fall into one of these categories, based on a common set of benchmarks:
Traditional: above 20 pounds. Comfortable, often includes camp luxuries, common among first-time backpackers.
Lightweight: 10 to 20 pounds. A deliberate mix of comfort and efficiency.
Ultralight: under 10 pounds. Requires careful gear choices and usually some compromise on comfort.
Super ultralight: under 5 pounds. A niche pursuit that demands serious gear knowledge and trip-specific judgment.
For a typical three-season overnighter, a 12 to 15 pound base weight is realistic for most hikers without spending a fortune on titanium everything. Long-distance thru-hikers often push toward 10 to 12 pounds, since shaving weight compounds over hundreds of miles in a way it simply doesn’t over one weekend.
Base weight is only half the equation, though. Add food, water, and fuel, and you get total pack weight. A widely cited rule of thumb says total pack weight shouldn’t exceed roughly 20% of your body weight. It’s a rough ceiling, not gospel, but it’s a useful sanity check once you know your base weight and start adding consumables on top.
Why the Big Three Deserve Your Attention First
Your pack, shelter, and sleep system typically make up a large portion of your total base weight. That’s not a minor share. It means the fastest, most efficient path to a lighter kit runs through those three items, not through swapping your spork for a titanium one.
Think about the math. Shaving two ounces off your first-aid kit is a nice gesture. Shaving two pounds off your tent by switching to a trekking-pole shelter or a tarp is a real, measurable shift in what you feel on your shoulders at hour six. The Big Three account for the majority of most base weights, which is exactly why gear reviewers obsess over them and why you should too.
Some concrete examples of where the savings actually live:
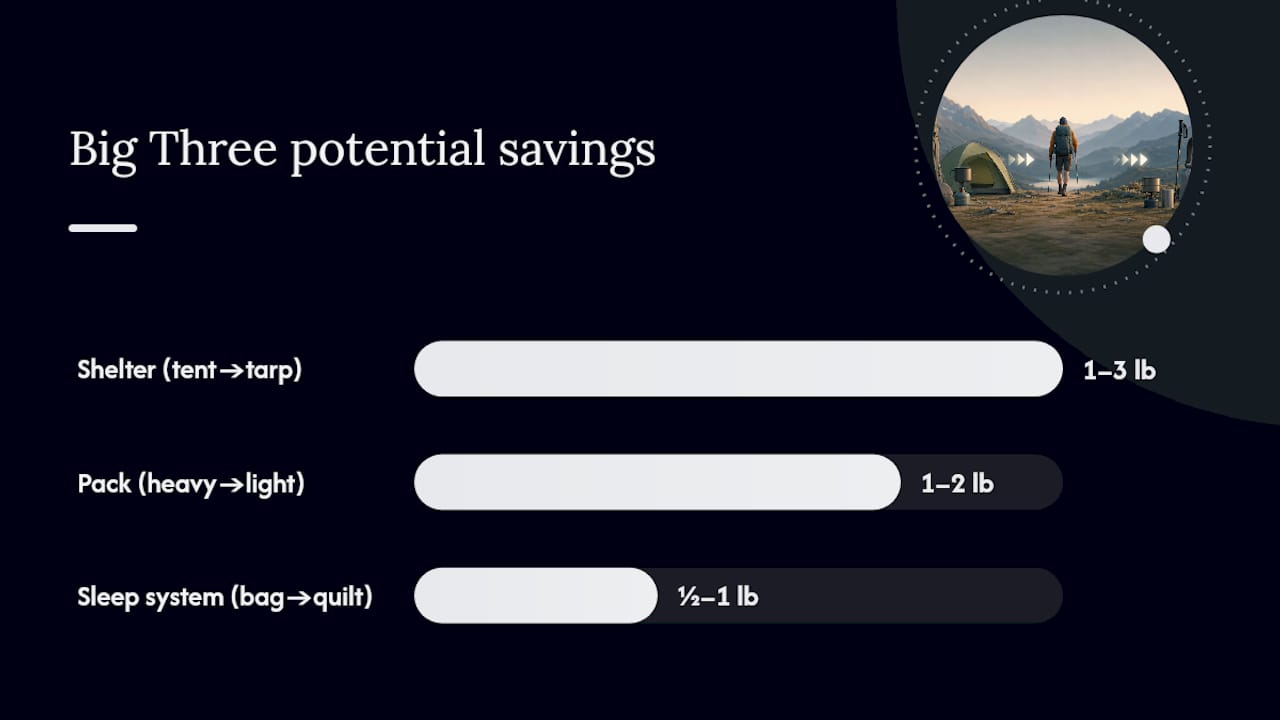
Tent to tarp or trekking-pole shelter: often saves 1 to 3 pounds, depending on what you’re currently carrying.
Sleeping bag to quilt: commonly saves half a pound to a full pound, since a quilt skips the insulation and zipper you compress underneath your body anyway.
Heavy internal-frame pack to a lighter frameless or minimalist-frame pack: can save 1 to 2 pounds, though this swap only makes sense once your total loaded weight is low enough that you don’t need heavy suspension.
That last point carries a real caveat. A frameless pack that feels great at 25 pounds can feel miserable at 35. Weight swaps in the Big Three only pay off when they match your actual loaded weight and the conditions you’re heading into. A tarp shelter that saves two pounds is a poor trade if you’re hiking into a week of forecasted rain and wind with no experience pitching one.
Pro Tip: Before you buy a lighter version of anything, check what percentage of your total base weight that item represents. If it’s 25%, that’s where your money and effort belong.
Right-sizing matters here too. A three-season quilt in freezing shoulder-season conditions isn’t a weight savings. It’s a risk you’re carrying instead of grams.
How to Cut Base Weight Without Cutting Corners
Lowering base weight isn’t about ditching your first-aid kit or hiking into cold nights underprepared. It’s about being deliberate with everything you carry. Work through this in order:
Audit for redundancy. Do you need two knives? A backup headlamp and a backup battery pack? Redundant systems add up fast and rarely earn their weight.
Decant everything in retail packaging. Sunscreen, bug spray, hand sanitizer, and toiletries almost always come in oversized bottles. Transfer them to small travel containers and you’ll shave ounces across a dozen small items at once.
Combine functions wherever you can. A multi-use item that serves two jobs, a trekking pole that doubles as your shelter support, a pot that doubles as your bowl, beats carrying two single-purpose items every time.
Right-size your gear to the actual trip. A 15 degree bag makes no sense for a summer trip forecasting 55 degree lows. Match your shelter, sleep system, and clothing layers to real conditions, not worst-case scenarios you’re unlikely to face.
Choose lighter materials where the trade-off is reasonable. Titanium cookware, cuben fiber or Dyneema shelters, and carbon-fiber poles all cost more but save real weight, provided you can afford the upgrade and trust the material for your terrain.
A few other habits worth building:
Test any new lighter setup on a short, familiar trip before you trust it somewhere remote or high-consequence. Testing lighter gear close to home first catches problems while help is still nearby.
Never cut a genuine safety item to save weight. A proper first-aid kit and reliable navigation tools aren’t the place to go ultralight if it means going without.
Repair before you replace. Carrying a small repair kit is often lighter than carrying spare parts for everything that might fail.
A Simple Checklist and 30-Day Plan to Trim Your Kit
Start with a shakedown. Lay out your full kit, weigh everything, and flag anything you’re carrying “just in case” without ever having used it. Decant your liquids. Check whether your Big Three items are pulling their weight relative to their share of your total.
From there, spread the work over a month instead of trying to fix everything the night before a trip:
Week one: Weigh every item and build your full gear list in a spreadsheet or LighterPack. Identify your five heaviest non-Big-Three items.
Week two: Research and price out one Big Three swap, whether that’s a lighter pack, shelter, or sleep system, based on where your money will do the most good.
Week three: Test any new gear on a short overnight or a backyard trial run before committing to it on a real trip.
Week four: Finalize your list, re-weigh your full kit, and log the new total against your original baseline.
Track it with fields for item name, weight in ounces, category (Big Three, clothing, cooking, electronics, safety), and notes on whether it’s worn or packed. That last column matters more than people expect, since it’s the one most hikers forget to track consistently.
Behind This Guide: Field-Tested Advice From Thrillofit
.
This guide was built around one idea: gear advice should be measurable, not aspirational. That means recommending real numbers you can weigh and verify, not vague promises about feeling lighter on the trail. A few related reads worth pairing with this one:
The ten essentials for hiking guide covers what belongs in your kit regardless of your weight goals.
The backpack fit guide explains why a properly fitted pack matters more than a lighter one that rides wrong on your hips.
Layering strategy helps you right-size clothing weight without leaving yourself cold.
Test any lighter configuration close to home before trusting it on a remote trip, and never trade away a genuine safety item to hit a number on a spreadsheet.
What Most Base Weight Advice Gets Backward
Most gear guides start with product recommendations: buy this tent, buy this quilt, buy this pack. That’s backward. You can’t know which swap is worth your money until you know your current number, and most hikers who chase ultralight gear before weighing their kit end up spending hundreds of dollars shaving ounces off items that were never the problem in the first place.
The conventional advice also treats every gram as equally worth chasing. It isn’t. A pound off your tent changes your trip. A pound off your first-aid kit usually means you cut something you’ll wish you had. The Big Three represent the majority of most hikers’ base weight, and that’s where the discipline of measuring first actually pays off: it tells you where your money and effort belong instead of scattering both across a dozen small purchases.
My honest read is that most hikers don’t have a gear problem. They have a measurement problem. They’ve never weighed their kit item by item, so they’re guessing at what to fix. Start with the scale, not the gear store, and the smart swaps become obvious on their own.
— S
Where to Go Next for Gear Guidance
Thrillofit exists for exactly this kind of practical, field-tested breakdown: not just what gear to buy, but why it matters and how to verify it yourself before you trust it on trail. If this guide got you weighing your own kit for the first time, that’s the point. The numbers do the convincing better than any product pitch could.
Pair this with the ten essentials guide if you’re building or auditing a kit from scratch, or the pack fit checklist if your next swap is the pack itself. Both cover ground this article couldn’t fully unpack, and both come from the same measurement-first approach. Head to Thrillofit for more gear breakdowns and trip-planning guides built the same way: test it, weigh it, then trust it.
Sources
These sources back the definitions, benchmarks, and methods covered above:
FAQ
How Do I Know What My Base Weight Is?
Weigh every non-consumable item in your kit individually, using a kitchen scale for small gear and a luggage scale for bulkier pieces, then total the weights in a spreadsheet or LighterPack. Leave out food, water, and fuel since those are consumables, not base weight.
Is 40 Pounds Too Heavy for Backpacking?
For most hikers, total pack weight above the traditional tier likely exceeds the 20% of body-weight guideline unless you’re a larger or very fit hiker. It’s not automatically dangerous, but it’s a signal to audit your Big Three and cut redundant items.
Is 35 Pounds Too Heavy for Backpacking?
It depends heavily on your body weight, trip length, and how much water and food you’re carrying at that moment. If 35 pounds is your loaded pack weight on day one of a long trip with heavy food and water, that’s reasonable; if it’s your base weight alone, it sits in the heavier end of the traditional tier and has real room to shrink.
Is 50 Pounds Too Heavy for Backpacking?
For most adult hikers, 50 pounds of total pack weight is high enough to strain the 20% body-weight rule of thumb and increase fatigue and injury risk over multi-day trips. Weigh your kit item by item to find out how much of that 50 pounds is base weight versus consumables, since the fix looks different depending on which one is driving the number.
Recommended
Comments