

Bow Drill Fire in 5–15 Minutes: A Reproducible Beginner Setup

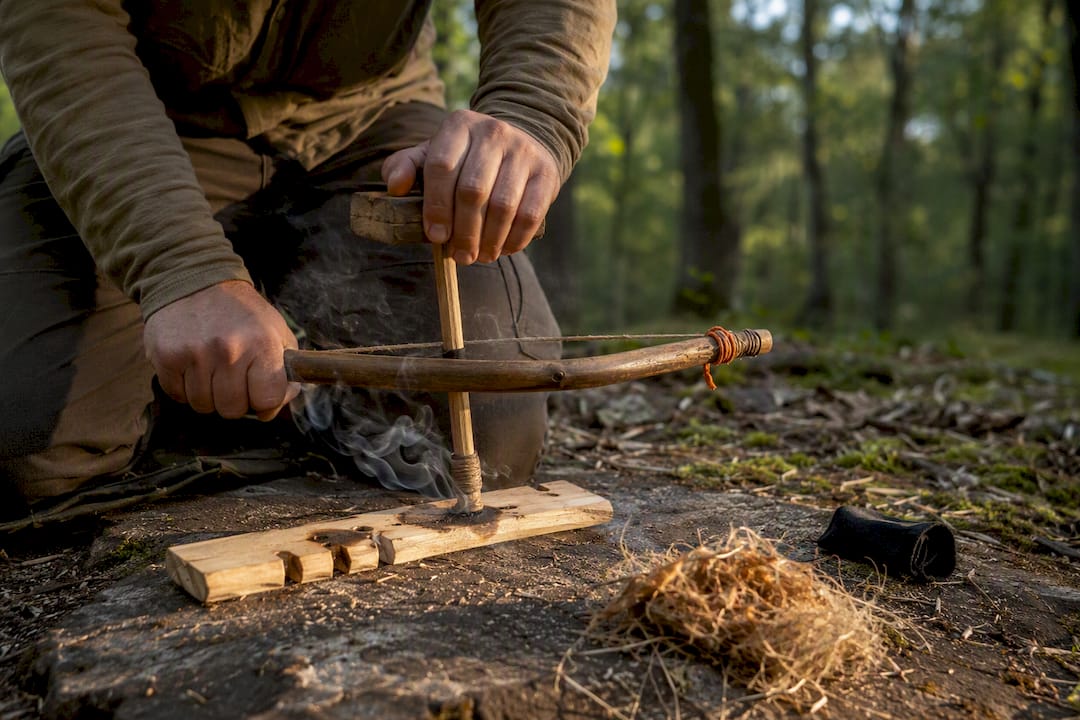
Yes, you can start a fire with a bow drill using dry softwood, a correctly cut notch, and steady downward pressure. Skilled practitioners routinely produce a smoking ember in 30 to 60 seconds of drilling. Beginners should expect their first successful ember to take longer, often 5 to 15 minutes including setup. This guide walks through the materials, the exact carving dimensions, the drilling technique, and the fixes for when things go wrong.
TL;DR:
Beginners should expect their first successful ember to take 5 to 15 minutes, while skilled practitioners produce one in under a minute.
The spindle should be 8 to 10 inches long with a 3/4 inch diameter, carved to a blunt point at one end and rounded at the other.
Proper notch geometry is crucial, requiring it to reach the center of the burn socket and be cleanly cut to prevent dust buildup inside the socket.
Wood choice is critical; dry, softwood species like willow and basswood work best, while resinous woods like pine can hinder successful fire starting.
Achieving a stable, vertical spindle by locking the wrist against the shin significantly improves the chances of forming an ember.
Table of Contents
What You Need for a Bow Drill Fire Setup
A bow drill set has five parts, and getting any one of them wrong is usually why your first ten attempts fail. Before you touch a knife to wood, know what each piece does and why the wood you pick matters more than almost any other variable.
The fireboard (or hearth board) is the flat piece the spindle spins against. Friction here creates hot wood dust that eventually ignites. The spindle is the vertical stick that spins, driven by the bow, a curved stick strung with cord that wraps once around the spindle. The bearing block (or handhold) sits on top of the spindle and applies downward pressure while your hand stays protected from the heat and spin. Cordage connects the two ends of the bow and needs enough tension to grip the spindle without slipping. Finally, your tinder bundle is what actually catches the ember and turns it into flame.
Wood choice decides success or failure more than any technique refinement. Dead, dry softwoods work best for both fireboard and spindle. Willow, cottonwood, basswood, poplar, and non-aromatic cedar are the classic go-to species across most temperate regions. Avoid resinous woods like pine and fir when possible. Their sap gums up the socket and interferes with dust formation. Hardwoods like oak or maple are generally too dense to generate enough friction heat before your arms give out.
Testing dryness is simple: press your thumbnail into the wood. If it leaves a visible dent easily, the wood is soft and dry enough to work. If your nail barely marks it, the wood is either too hard or still holding moisture. A reliable bow-drill set depends on both fireboard and spindle passing this test, and matching the two species produces finer, more consistent dust than mixing a soft spindle with a harder board.
For tinder, you want fine, fibrous material that catches a spark easily: dried grass, inner bark scraped into fluff, cattail fluff, or fine wood shavings from your carving work. Keep a stash of pre-shredded tinder in a dry pouch or tin so you’re never scrambling for it mid-attempt. If you’re building this kit from scratch, a paracord field guide is worth reading before you commit to a specific cord type for your bow string.
Materials checklist:
Fireboard: 3/4 inch thick, dry softwood, about 12 inches long
Spindle: straight, dry softwood dowel, 3/4 inch diameter, 8 to 10 inches long
Bow: slightly curved stick roughly the length of your arm, with cord strung at moderate tension
Bearing block: dense wood, bone, or stone with a shallow depression to seat the spindle top
Cordage: rawhide, paracord inner strands, or natural fiber cord
Tinder bundle: dry grass, inner bark fluff, or fine shavings, roughly fist-sized
How to Carve and Size a Bow Drill Set
Dimensions matter more than most beginners expect. A spindle that’s too thin burns through too fast; one that’s too thick won’t spin fast enough to generate the friction you need.
Cut the spindle to 8 to 10 inches long and about 3/4 inch in diameter. Carve one end into a blunt point, almost like a dull pencil tip, and leave the other end slightly rounder so it seats cleanly in the bearing block.
Shape the fireboard from a flat piece roughly 3/4 inch thick, 2 to 3 inches wide, and 12 inches long. Flatten one face so the spindle sits stable during drilling.
Match the species. Using the same wood type for spindle and board produces finer, more even dust than mixing hardness levels, a detail that separates a quick ember from a frustrating afternoon of squeaking and smoke that never quite forms.
Mark the socket location about an inch from the fireboard’s edge, using your spindle’s diameter as a rough guide for spacing.
Burn in the initial socket by spinning the spindle in place for 20 to 30 seconds until you see a small blackened depression form. This creates the seat that the finished notch will later intersect.
Build or find your bow. A slightly curved branch about arm’s length works fine. Green wood with natural spring is often better than dead, brittle wood here since it needs to flex slightly under tension without snapping.
String the bow at moderate tension, tight enough that one wrap around the spindle grips firmly but loose enough to let the spindle spin freely inside the loop.
Prepare the bearing block. A palm-sized piece of hardwood, antler, bone, or even a smooth stone with a small depression works. Add a drop of lubricant, saliva works in a pinch, or a bit of grease if you have it, to reduce friction at this contact point since heat here only wastes your energy.
If your knife is dull, none of this shaping goes smoothly, and a sharp survival knife makes the difference between clean, fast carving and fifteen frustrating minutes of sawing at green wood.
How Do You Burn In the Socket and Cut the Notch?
The notch is where most beginners fail, more often than any other single step in the whole process. Get this wrong and you can drill perfectly and still never see an ember.
Once your burn-in socket is dark and smoking slightly on its own, stop and let it cool for a moment. You now need to cut a notch into the fireboard that reaches the exact center of that burned socket. Think of the notch as a pie slice, roughly one-eighth of a full circle, or about a 45 degree wedge, cut from the edge of the board straight into the middle of the burn hole.
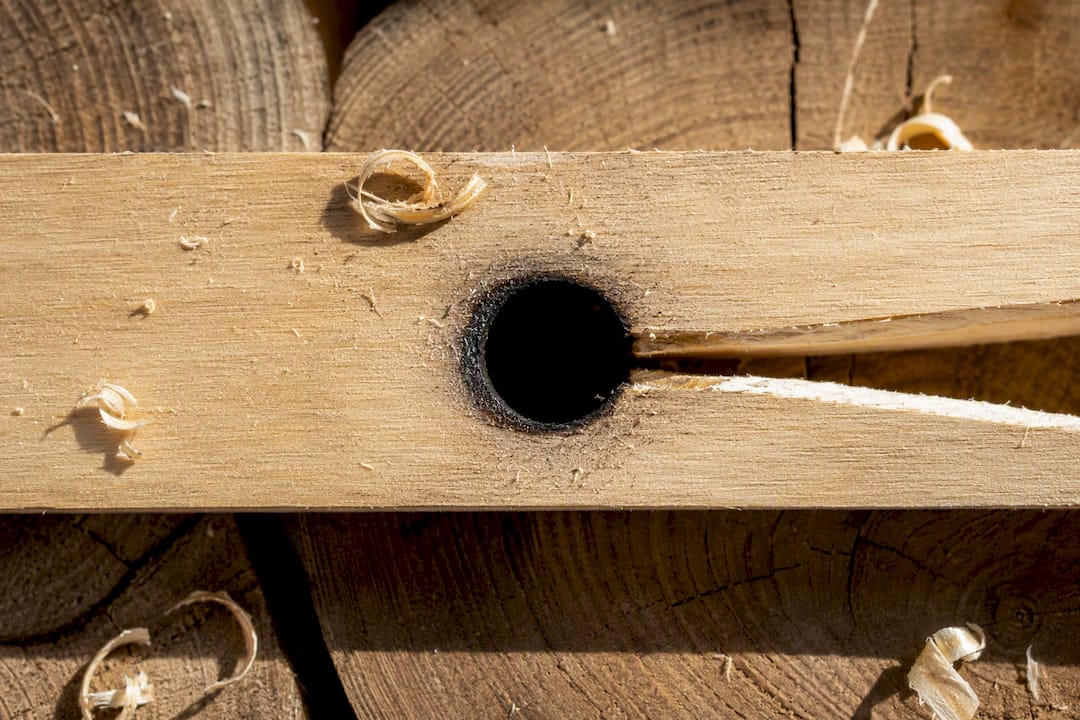
This geometry matters because the notch is the channel that lets hot dust escape the socket and pile up into a coal-sized mound. If the notch is too narrow or doesn’t quite reach center, dust builds up inside the socket instead of collecting outside it, and you’ll get smoke without ever forming a real ember. The notch and burn-in sequence is the single most repeated failure point in bow drill fire starting, which is exactly why it deserves more attention than beginners usually give it.
Slide a thin piece of bark, a leaf, or a scrap of cloth directly underneath the notch before you resume drilling. This catches the falling dust in one place instead of letting it scatter across the ground, and it lets you transport the growing ember without touching it directly.
Quick notch-fixing checklist:
Notch doesn’t reach center: widen it slightly with your knife tip until it touches the burn hole
Notch edges are ragged: clean them with a few careful knife strokes so dust falls freely instead of catching on splinters
Dust piles up inside the socket instead of outside: the notch is too shallow or too narrow, cut it wider
Board splits near the notch: you’ve cut too close to the edge, start a new socket farther from that side
Pro Tip: Cut your notch before your final drilling attempt, not during a break mid-session. A notch cut on a warm, already-burned socket comes out cleaner than one carved into cold, hard wood.
Bow Drill Fire Technique: Posture and Stroke
Your body position controls almost everything about whether you get smoke or an ember. Get the mechanics right and speed becomes almost irrelevant.
Kneel on one knee, plant your opposite foot flat on the ground, and pin the fireboard down with that foot’s arch, close to the notch edge without covering it.
Lock your drilling wrist against your shin. This is the single change that fixes more shaky, wandering spindle problems than any other adjustment. With your wrist braced against bone instead of floating free, the spindle stays vertical and stops wobbling out of the socket mid stroke.
Seat the spindle into the fireboard socket, wrap the bow cord once around it, and set the bearing block on top, holding it steady with your free hand.
Start with slow, full-length bow strokes, using the entire length of the bow rather than short, choppy movements. Full strokes generate more consistent rotation per stroke and tire your arm less over time.
Apply steady downward pressure through the bearing block from the very first stroke. This matters more than speed. Many beginners drill frantically fast with too little downward force, and end up with a warm, dry socket but no ember at all.
Gradually increase your pace once you see smoke starting, while keeping pressure constant or even slightly increasing it as dust builds.
Watch for thick, dark smoke and a small pile of fine, dark brown to black dust collecting at the notch. Thin, light gray smoke usually means insufficient pressure or a wood combination that’s too hard.
Stop drilling once you see a substantial dust pile and thick smoke continuing to rise on its own for a second or two after you stop moving the bow. That’s your ember forming inside the pile.
Pro Tip: Pressure beats speed almost every time. If your arms are burning out before you see real smoke, you’re probably drilling too fast with not enough downward force behind the bearing block.
Moving the Ember Into Your Tinder Bundle
The ember you just created is fragile, roughly the size of a grain of rice, and it can die in seconds if handled wrong. This next stage is where a lot of hard-earned embers get wasted.
Before you even start drilling, have your tinder bundle ready and shaped into a loose, nest-like ball of fine, dry material, sometimes called a bird’s nest. Fibrous inner bark, dried grass, and fine wood shavings all work well packed loosely enough for air to move through.
Once you’ve stopped drilling and smoke keeps rising from the dust pile on your bark catcher, wait a few seconds to let the ember consolidate. Then lift the bark carefully, tilt it gently, and drop the ember into a small depression pressed into the center of your tinder nest. Don’t crush or poke it. Fold the tinder loosely around the ember instead.
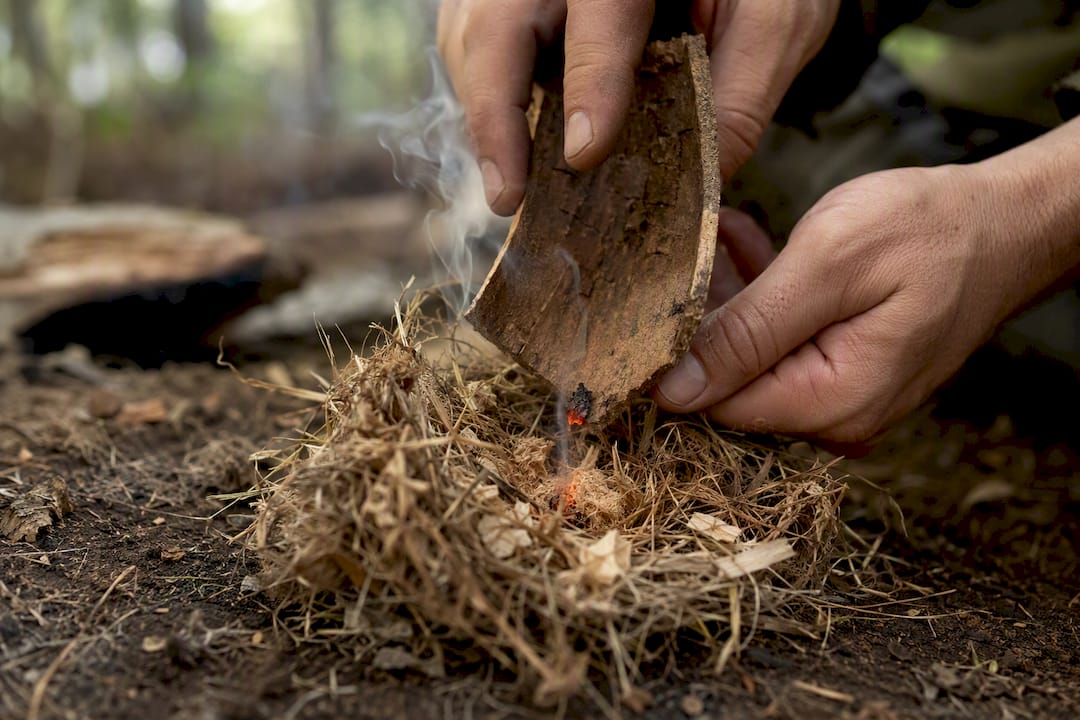
Lift the bundle close to your face and blow long, steady breaths, not short frantic puffs, aimed at the glowing spot. As the ember heats the surrounding fibers, you’ll see smoke thicken and the glow spread. Increase your breath intensity gradually as more of the bundle starts smoking. Within a few breaths, the whole bundle should burst into flame. The moment that happens, set it down on your prepared fire lay immediately and start feeding it small twigs before the flame burns through the loose tinder.
Getting to flame:
Keep the tinder bundle loose enough for airflow, tightly packed nests smother embers
Blow steadily, not in sharp bursts, and increase intensity only once smoke thickens
Have kindling staged and ready before you start blowing, not after you get flame
Transfer to your fire lay the instant flame appears, don’t wait to admire it
Bow Drill Fire Troubleshooting: Common Problems and Fixes
Nearly every failed attempt traces back to one of a handful of repeatable problems. Here’s the fast diagnostic reference to work through when something isn’t clicking.
Symptom | Likely Cause | Fix |
No smoke at all | Wood too hard, damp, or insufficient pressure | Switch wood species, check for dryness, increase downward force |
Light smoke, no dust pile | Notch too shallow or doesn’t reach center | Deepen and widen the notch until it touches the burn hole |
String keeps slipping | Cord too loose or too smooth | Tighten wrap, add a second wrap, or roughen the cord surface |
Spindle polishes and squeaks | Bearing block or socket too smooth, insufficient grit | Roughen the spindle contact point or add a bit of grit to the socket |
Ember forms but dies quickly | Tinder too damp or packed too tight | Loosen the bundle and switch to drier, finer tinder fibers |
Board splits during drilling | Socket too close to the board’s edge | Start a fresh socket farther from that edge on a new section of board |
The troubleshooting checklist above covers most failures, but the underlying fix is almost always one of three things: adjust your wood, adjust your notch, or adjust your pressure. If a socket becomes too polished or glazed to produce dust anymore, don’t keep fighting it. Cut a fresh one nearby rather than wasting more energy on a socket that’s stopped working. And if you’re working in damp conditions, splitting open a dead standing log often reveals dry interior wood suitable for a working set, even right after rain.
How Long Does It Take to Learn Bow Drill Fire?
Skilled practitioners often get an ember in under a minute of actual drilling. Beginners should expect 5 to 15 minutes total, and most of that time goes into carving and burn-in rather than the drilling itself.
Three practice drills speed up the learning curve. First, practice burn-in alone on scrap wood until you can produce a clean, dark socket in under 30 seconds. Second, drill without worrying about an ember at all, just focus on smooth, full-length strokes and locking your wrist against your shin until it feels automatic. Third, once you’re comfortable, time yourself from notch to ember and try to shave seconds off each attempt.
Keep a dedicated practice fireboard separate from your “real” one for drills
Store your finished set in a dry bag so it’s ready without re-carving
Re-check your notch and bearing block depression before every new session
Log each attempt’s time and outcome to spot what’s actually improving
Why Trust This Bow Drill Fire Guide
This guide pulls from field-tested bushcraft methods rather than theory, matching wood species, notch geometry, and body mechanics against what actually produces embers in practice. The mechanical advantage of the bow drill over simpler hand-drill methods comes from constant rotation combined with sustained downward pressure, and that combination is what every step above is built around.
Thrillofit covers fire craft as part of a broader survival skills library. If you’re building toward a complete outdoor safety kit, read through the guide on starting a fire without a lighter and the beginner’s fire safety guide next, both cover ground this article doesn’t.
What I’d Tell a Beginner Starting Out
If you’re picking your first set, go with a willow or basswood board matched to a spindle of the same wood. Skip cedar until you’ve got a few embers under your belt since its resin content trips up new hands. The single biggest fix I’ve seen change outcomes is locking the wrist against the shin. It turns a wobbling, inconsistent spindle into a stable one almost overnight. Log your attempts, even the failed ones. Patterns show up faster than you’d expect.
— S
Keep Practicing With Thrillofit’s Fire-Craft Resources
Once you’ve got your first ember, the real skill building starts. Thrillofit’s survival guides go deeper into the fire craft fundamentals that bow drilling builds on, from safe fire management to what to cook once you’ve got flame going. Check the beginner’s fire safety guide for how to manage your flame once it’s established, and browse campfire cooking hacks for what comes after.

If you’d rather keep a backup ignition method in your kit while you build your bow drill skills, a rope-style camping lighter is a practical adjacent tool worth having alongside your primitive fire kit. And if hand carving your spindle repeatedly is wearing down your blade, brush up on knife sharpening technique so your tools stay ready for the next attempt. Head to Thrillofit to browse the full survival skills library and find your next skill to build on.
Sources
Recommended
Comments