

Magnetic Declination for Hikers: Avoid Hundreds of Feet Off Course


Magnetic declination is the angle between magnetic north (where your compass needle points) and true north (the geographic North Pole). It shifts by location and by year, so every bearing you take needs a correction before you trust it on a map. Skip that step and you can walk hundreds of feet off course over a mile of travel. The NOAA/NCEI declination tool and the World Magnetic Model give you the current correction for free in under a minute.
TL;DR:
Declination varies by location and year, so you must update your correction regularly to prevent walking off course by several hundred feet over a mile.
Declination models are accurate within about half a degree under normal geomagnetic conditions, but local anomalies and storms can cause larger errors.
Use the NOAA/NCEI declination calculator with current data and the correct epoch to get reliable correction values before each trip.
Always treat west declination as negative and east as positive when applying the formula T = M + V, regardless of compass type.
Verifying declination against landmarks periodically during navigation is crucial for safe and accurate foot travel.
Table of Contents
What Is Magnetic Declination, Exactly?
Picture standing at a spot where true north (the direction to the geographic pole, the one on every topographic map) and magnetic north (the direction your compass needle swings toward) don’t line up. The gap between them is the declination angle for that location. In parts of Maine it runs significantly west. In parts of Alaska it swings significantly east. Stand in the middle of the country, roughly along a line through Wisconsin and Illinois, and it can be close to zero.
NCEI defines declination as positive when magnetic north sits east of true north, and negative when it sits west. That sign convention shows up on every map legend and every calculator output, so it’s worth memorizing rather than re-deriving in the field.
East declination (+): Magnetic north points east of true north. Add the value to convert magnetic to true.
West declination (−): Magnetic north points west of true north. You’ll subtract, which the formula handles automatically once you treat west as a negative number.
Symbols to recognize: °E and °W on paper maps, or a plain plus/minus sign on digital tools and GPS units.
Two related terms trip people up. Deviation is a different animal entirely. It’s the compass error caused by nearby metal or magnetic material (a knife on your belt, a car dashboard, a steel pack frame), not by the Earth’s field. Grid declination, sometimes called the grid-magnetic angle, is the offset between magnetic north and the grid north lines printed on a UTM or topographic map. Map grids don’t always align perfectly with true north because of how the projection is drawn, so a stickler doing precision work accounts for grid convergence separately from magnetic declination.
Why Declination Keeps Changing Under Your Feet
Declination isn’t a fixed number stamped on the planet. It drifts because the source of Earth’s magnetic field, the churning liquid iron in the outer core roughly 1,800 miles below your boots, never sits still. That fluid motion generates the main dipole field (the simple bar-magnet-like pattern) plus smaller non-dipole components that skew and warp it regionally.
The result is secular variation, a slow, ongoing drift measured in most places at a fraction of a degree per year. That sounds trivial until you realize old charts and hand-me-down maps can be off by several degrees if nobody’s updated them in a decade or two. Near the magnetic poles, where the field’s horizontal strength weakens and direction becomes touchy, the drift accelerates and can shift multiple degrees within just a few years.
Regional drift: Slow and predictable across most of the continental United States, tracked continuously by government models.
Polar acceleration: Faster, less predictable shifts near the magnetic poles as the underlying field geometry changes.
Crustal anomalies: Localized rock formations with their own magnetism can distort readings independent of the global trend.
Geomagnetic storms: Solar activity can bend the field temporarily, adding short-lived noise on top of the long-term drift.
The number that matters: Declination models used by NOAA are typically accurate to about 30 arcminutes, or half a degree, under normal geomagnetic conditions. That’s precise enough for almost any foot navigation task, but it assumes you’re using a current model and you’re not in the middle of a magnetic storm or standing on an anomaly.
None of this is exotic physics reserved for geophysicists. It’s the reason a compass reading from a map printed in 2005 can quietly betray you on a 2026 hike, and why every serious navigation habit starts with checking the date on your declination source.
How to Find Your Current Magnetic Declination
The NOAA/NCEI declination calculator is the tool most navigators default to, and for good reason: it’s free, it’s fast, and it pulls from the same government models that print declination values on official topographic maps. Type in a ZIP code, a place name, or exact coordinates, and it hands back the current declination for that spot, computed from the World Magnetic Model (WMM).
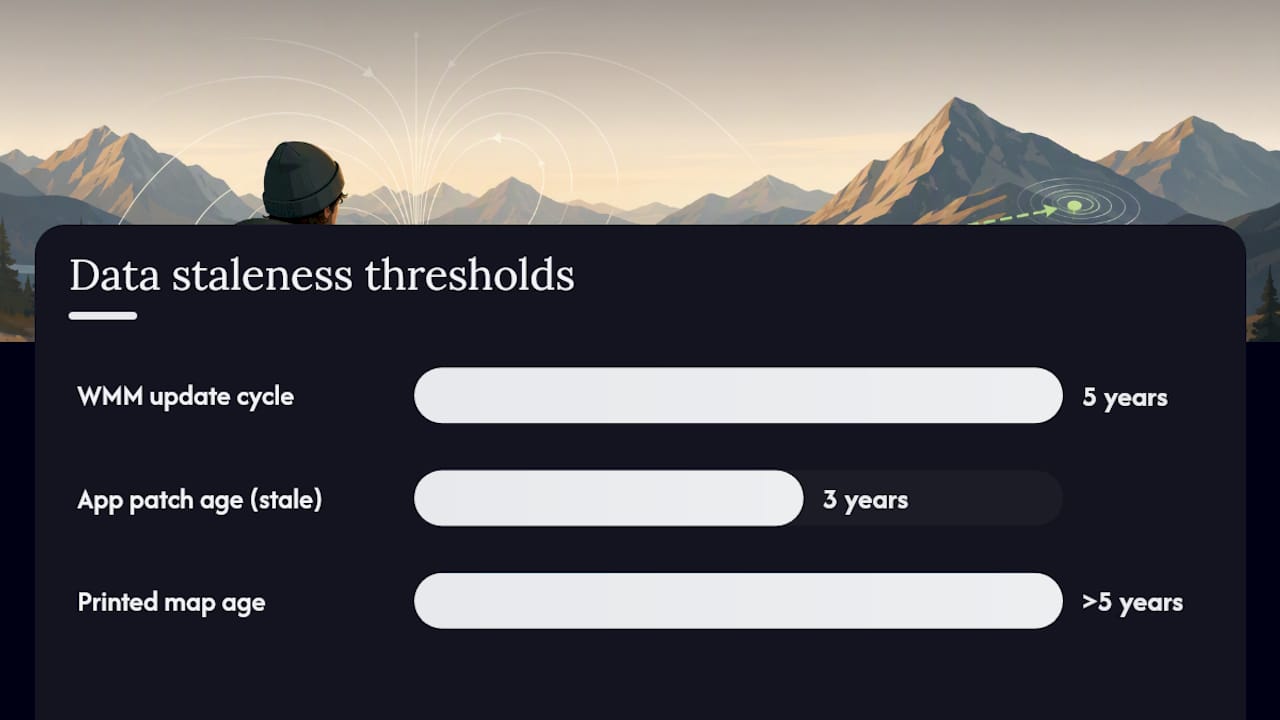
Other paths to the same answer exist. NOAA’s geomagnetic calculators let you query the WMM or the International Geomagnetic Reference Field (IGRF) directly, and the data comes back in HTML, XML, CSV, or JSON if you want to pull it programmatically for trip-planning software or a spreadsheet. Mobile apps and some GPS units calculate declination on the fly using onboard versions of these same models, though accuracy depends entirely on how recently that app’s model was updated. An app that hasn’t been patched in three years is quietly feeding you stale data.
Here’s what actually determines whether the number you get is trustworthy:
Model epoch: WMM releases run on a five-year cycle (the current one covers 2025 through 2029). Punch in today’s date, not the date your map was printed.
Accuracy under normal conditions: Expect results within roughly 30 arcminutes, or about half a degree, which is tight enough for foot travel.
Historical comparison: NOAA also maintains isogonic charts, lines connecting points of equal declination, if you want to see how a location’s value has shifted over decades.
When to be more careful: High latitudes, known local anomalies, and active geomagnetic storms can all push you outside that half-degree comfort zone.
Pro Tip: Bookmark the NOAA calculator on your phone before you lose signal, and screenshot the result for your specific trailhead. A saved screenshot works when cell service does not.
Most printed USGS topographic maps list a declination value in the margin, but that number is frozen at the map’s print date. If your map is more than five years old, run it through the current calculator instead of trusting the margin note. This one habit prevents more compass errors than any other single fix.
Converting Bearings: The Formula That Runs the Whole System
Every declination correction boils down to one equation: T = M + V, where T is true bearing, M is magnetic bearing, and V is the declination value with its sign attached. West declination gets treated as a negative number, so subtracting a west value and adding an east value both fall out of the same formula automatically. You never need two separate rules to memorize, just one sign convention applied consistently.
That’s exactly the convention NOAA uses in its own bearing calculators: plug in your magnetic bearing, plug in declination as signed, and add.
Adjusting a rotating-dial baseplate compass:
Find current declination for your location and note whether it’s east or west.
Locate the small screw or dial mechanism at the base of the direction-of-travel arrow (most quality baseplate compasses have one).
Rotate the declination adjustment until the orienting arrow shifts by the correct number of degrees in the correct direction.
From that point forward, every bearing you read off the dial is already a true bearing. No mental math required.
Re-verify the setting each season or before any trip more than a year out from your last check.
Working the math on a floating-card compass (no adjustable declination):
Floating-card compasses give you a raw magnetic bearing every time, full stop, so you handle the correction by hand using T = M + V. It’s slower, but it’s also one less mechanical part to fail.
Task | Steps |
Map bearing to compass bearing | Read true bearing off map, then subtract declination (add if west, since west is negative) to get the magnetic bearing you’ll actually walk |
Compass bearing to map bearing | Read magnetic bearing off compass, then add signed declination to plot the true bearing on your map |
Quick sanity check | Compare your corrected bearing against an obvious landmark; a wildly different direction means a math error, not a broken compass |
Field troubleshooting | Move away from metal objects, recheck the reading, and confirm you used the current declination value for your exact location |
This same formula is the backbone of compass triangulation, the technique for pinpointing your own position by shooting bearings to two or three known landmarks, plotting the reciprocal of each line on your map, and reading your location off the point where they cross. Get the declination correction wrong on even one of those sightings and your triangulated position lands you somewhere you’re not.
When Your Compass Correction Can’t Be Trusted
Declination math assumes a healthy, predictable magnetic field. That assumption breaks down in a few specific situations, and knowing them is the difference between confident navigation and a slow drift into trouble.
High latitudes are the biggest structural problem. Close to the magnetic poles, the horizontal component of Earth’s field, the part your compass needle actually reads, gets weak. The USGS notes that declination itself is a symptom of how complex the geomagnetic field gets near the poles, and a weak horizontal pull means a sluggish, unreliable needle even with a perfect declination correction applied.
Local magnetic anomalies are the more common everyday hazard. Magnetized rock formations, iron ore deposits, buried pipelines, even old mining debris can distort the field within a few dozen feet of your position, no polar latitude required. Test for this by taking a bearing, walking twenty feet in any direction, and taking it again. A meaningful swing between the two readings, more than what your instrument’s normal precision allows, flags an anomaly rather than a mistake in your math.
Weak horizontal field: Common above roughly 55 to 60 degrees latitude; needle response gets sluggish and less directional.
Crustal anomalies: Localized, often invisible on a map, detectable only by comparing repeated readings at different spots.
Geomagnetic storms: Solar particle activity can bend the field temporarily across wide regions.
Even a technically correct declination value won’t save you from a local anomaly. USGS field guidance treats verification against landmarks as a standard part of competent navigation, not an optional extra step for beginners.
Solar storms are rarer but worth knowing. Unusual compass jitter, a needle that won’t settle, or readings that contradict a clearly visible landmark during a period of known aurora activity are your cue to fall back on GPS or dead reckoning until conditions calm down.
Two Worked Examples You Can Practice at Home
Numbers make this concrete faster than any explanation. Try both before you ever need them on trail.
West declination, magnetic to true. You’re navigating in a region with 12 degrees west declination, and your compass reads a magnetic bearing of 220 degrees. Treat west as negative: V = −12. Apply T = M + V: 220 + (−12) = 208. Your true bearing for the map is 208 degrees.
East declination, true to magnetic. Your map shows a true bearing of 95 degrees to your target, and local declination is 8 degrees east (V = +8). Rearranging the formula to solve for M gives M = T − V: 95 − 8 = 87. Set your compass to 87 degrees magnetic to walk that line correctly.
Field scenario. Orient your map by aligning its printed north with true north, correcting for the same declination value you just used. Sight your target through the compass, read the magnetic bearing, walk it, and check your progress against a landmark every quarter mile. If the landmark shows up right where the map predicts, your correction was applied correctly.
This is the exact process behind reliable compass triangulation work: every bearing you shoot and plot depends on getting this single conversion right, every single time.
The Models Behind Every Declination Number
Every calculator, app, and printed map margin traces back to one of two scientific models: the World Magnetic Model (WMM) or the International Geomagnetic Reference Field (IGRF). Both describe Earth’s magnetic field mathematically using data from satellites and ground observatories, and both get revised on a schedule because the field itself keeps drifting.
WMM: Updated on a five-year cycle (current model spans 2025 to 2029), the standard behind most U.S. navigation and defense applications.
IGRF: An international collaborative model, revised roughly every five years, widely used in scientific and global navigation contexts.
Accuracy: Both are generally accurate to about 30 arcminutes under normal field conditions.
Finer detail: Higher-resolution regional models exist for crustal-level anomaly mapping, useful for scientific work but rarely necessary for foot navigation.
Access: NOAA/NCEI publishes downloadable model outputs and calculator APIs for anyone who wants raw data instead of a single lookup value.
Using an out-of-date epoch, plugging last decade’s model into this year’s trip, is one of the most common and most avoidable sources of navigation error.
Thrillofit’s Field Checklist for Declination
Before you leave the trailhead, look up current declination for your exact route and either set it on your compass or write the correction on your map margin. Once you’re moving, verify your bearing against a visible landmark every so often rather than trusting the needle blindly. Carry a map, a compass, and a phone as backups to each other, and calibrate all three before you rely on any single one when it counts.
Why This Skill Separates Confident Hikers From Lucky Ones
Declination math looks like trivia until the fog rolls in or the trail disappears under snow, and suddenly it’s the only thing standing between you and a bearing that’s twelve degrees off toward a ravine instead of a ridge. The USGS treats it as a permanent feature of navigation, not a beginner’s footnote, and that framing is correct.
Most hikers who get this wrong don’t fail at the math. They fail at the habit: pulling up a declination value once, years ago, and never checking it again. Practice the conversion at your kitchen table with a known bearing before you ever need it blind on a ridge line. Muscle memory beats mental math when your hands are cold.
— S
Practice These Skills Before You Need Them
Thrillofit built its navigation content for exactly this moment: the gap between reading about declination and actually trusting your compass on a real trail. Our step-by-step navigation skills guide walks through triangulation and bearing corrections in more field detail than any calculator page can offer, and it’s free to work through before your next trip.

If your kit needs a second look, our field guide to navigation tools covers which compasses handle declination adjustment well and which phone apps are actually worth trusting offline. Pair that with a map-reading refresher if grid north versus true north still feels fuzzy. Start with the navigation skills guide on Thrillofit, run one practice conversion tonight, and you’ll walk into your next trip already knowing your bearings are right.
Where to Verify Your Own Declination Numbers
Run your own location through the NOAA/NCEI declination calculator rather than trusting a secondhand figure, and use today’s date every time, not the date on an old map. The USGS declination explainer is a solid plain-language backup if you want the government’s own framing of why the number matters.
Sources
FAQ
Do I add or subtract magnetic declination?
You always add it, using T = M + V, but west declination is treated as a negative number, so adding a negative value produces the same result as subtracting.
Is it better to use true north or magnetic north?
Topographic maps are drawn to true north, so true north is the reference you navigate by; magnetic north is only useful as the raw compass reading you correct back to true.
How do I adjust my compass for declination?
On a baseplate compass with a declination adjustment screw, dial in the current value for your location so every bearing you read is already a true bearing; on a fixed compass, apply T = M + V by hand for each bearing.
How do I find the magnetic declination for my location?
Enter your coordinates or place name into the NOAA/NCEI declination calculator, which draws on the current World Magnetic Model and updates automatically as the model is revised.
Recommended
Comments