

Bear Bagging: What It Is and How to Do It Right

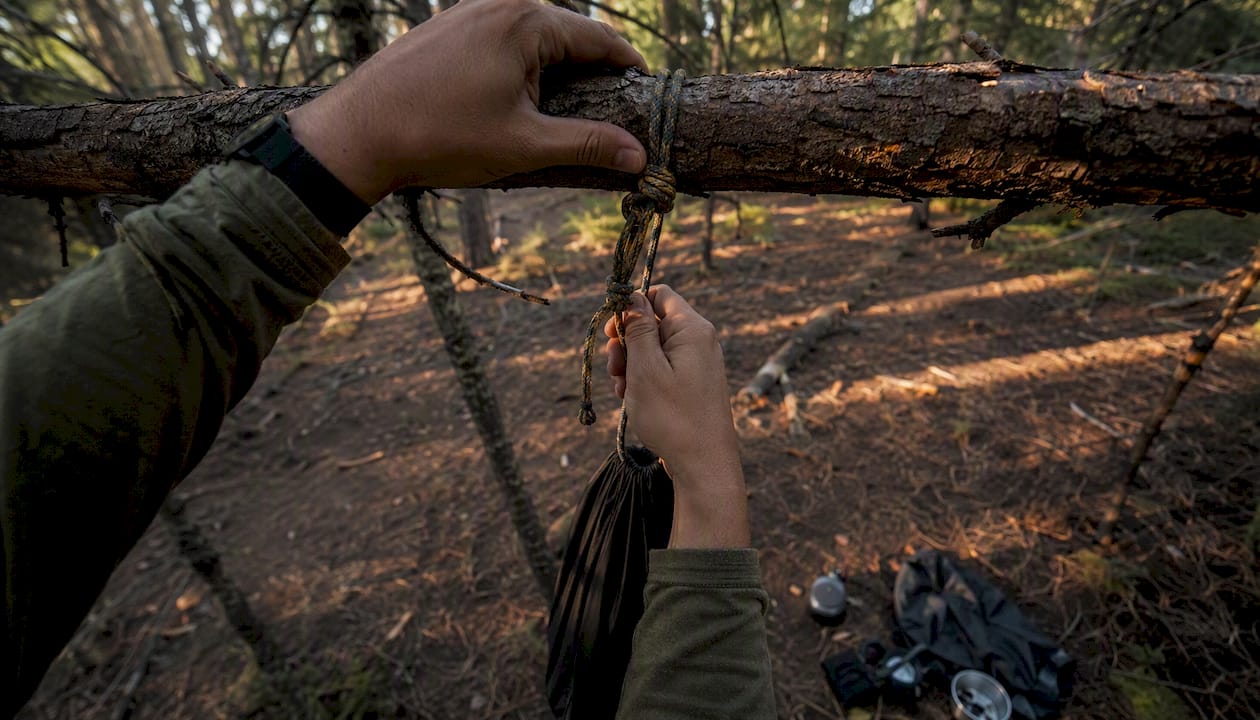
Bear bagging is the practice of suspending your food and scented items from a tree branch so wildlife cannot reach them. Use it in wooded backcountry where hard-sided canisters or camp lockers are not required by land managers. A proper hang sits roughly twelve to fifteen feet off the ground and about four to ten feet from the nearest trunk, per Washington Trails Association guidance.
When a hang works:
You’re in treed terrain with branches thick and high enough to support a load
The park or forest allows hanging as an approved storage method
You’re in black bear country with no documented habituation problem
When to use a canister or locker instead:
The park mandates certified bear-resistant canisters (Yosemite, parts of the Sierra, Olympic, some Adirondack zones)
You’re in grizzly country where hanging is widely considered insufficient
No suitable trees exist at your campsite
A bear locker is available at your site — use it, no debate needed
Key Takeaways
Bear bagging works when you execute it correctly in the right terrain, but park rules and bear species should determine your storage method before tree quality ever enters the decision.
Point | Details |
Core hang dimensions | Hang food 12–15 feet high and 4–10 feet from the trunk to deter climbers. |
Check regulations first | Some parks (Yosemite, parts of Sierra, Olympic) require hard-sided canisters — verify before you pack. |
Grizzly country = canister | In grizzly habitat, a hard-sided canister is the reliable baseline, not a hang. |
Practice before the trip | Execute the full PCT sequence at home until you can complete it in under 8 minutes. |
Store all scented items | Food, trash, toiletries, and cookware with residue all go in the bag — not just obvious food. |
Table of Contents
Why bear bagging protects both you and the bears
The stakes go well beyond losing your dinner. Bears that learn to associate people with food become what wildlife managers call “problem bears,” and the outcome for those animals is grim. University of Maine Outdoor Leadership documents that habituated bears are often relocated or euthanized because they cannot be retrained once the association is set. Proper food storage is one of the few things a backpacker can do that directly reduces that risk.
For people, the risk is more immediate. A bear that has already raided camps is bolder, less predictable, and more likely to approach tents. Wilderness access itself is on the line: repeated incidents in a zone can trigger permit restrictions or mandatory canister rules that affect every future visitor.
Leave No Trace and the National Park Service both treat food storage as a core wilderness ethic, not a suggestion. LNT specifically recommends practicing hang techniques before you rely on them in the backcountry, because a failed hang at 10 PM after a long day is how food gets lost.
Pro Tip: Practice your hang in the backyard or a local park before your trip. Time yourself. A hang you can execute in under ten minutes in daylight takes twice as long in the dark when you’re tired.
Where bear bagging is not enough — park rules and high-risk areas
Some areas have moved past the hang entirely. Washington Trails Association notes that parks including Yosemite, parts of the Sierra Nevada, Olympic National Park, and certain Adirondack zones require certified hard-sided canisters because hangs have proven unreliable against local bear populations. Grizzly country adds another layer: the combination of bear intelligence, strength, and the frequent absence of suitable trees makes hanging a poor primary strategy in most of the Greater Yellowstone Ecosystem and Alaska’s backcountry.
Before you rely on a hang, ask yourself:
Does this park or forest require a certified bear canister?
Are there bear lockers at my campsite?
Am I in grizzly or brown bear habitat?
Are there suitable trees with branches 15–20 feet up and at least 4 inches thick?
Has this area had recent bear activity or closures?
If you answer yes to the first three, a hang is either illegal or insufficient. Use the canister or locker.
Pro Tip: Find storage rules at the specific park or forest’s official website before you leave home. Screenshot the page and save it offline — cell service at the trailhead is rarely reliable. Many ranger stations also post current bear activity reports.
How to compare your food storage options
Each storage method has a different risk profile, weight cost, and regulatory standing. Here’s how they stack up:
Method | Bear resistance | Weight | Skill needed | Regulatory fit | Typical cost |
Bear bag hang | Moderate (tree-dependent) | Very light | High | Allowed most places | $10 for cord and sack |
Ursack (soft canister) | High (IGBC-approved models) | Light | Low | Accepted in some but not all parks | $70 |
Hard-sided canister | Very high | Heavy (2–3 lbs) | Very low | Universally accepted | $100 |
Camp locker | Highest | None (on-site) | None | Site-specific | Free |
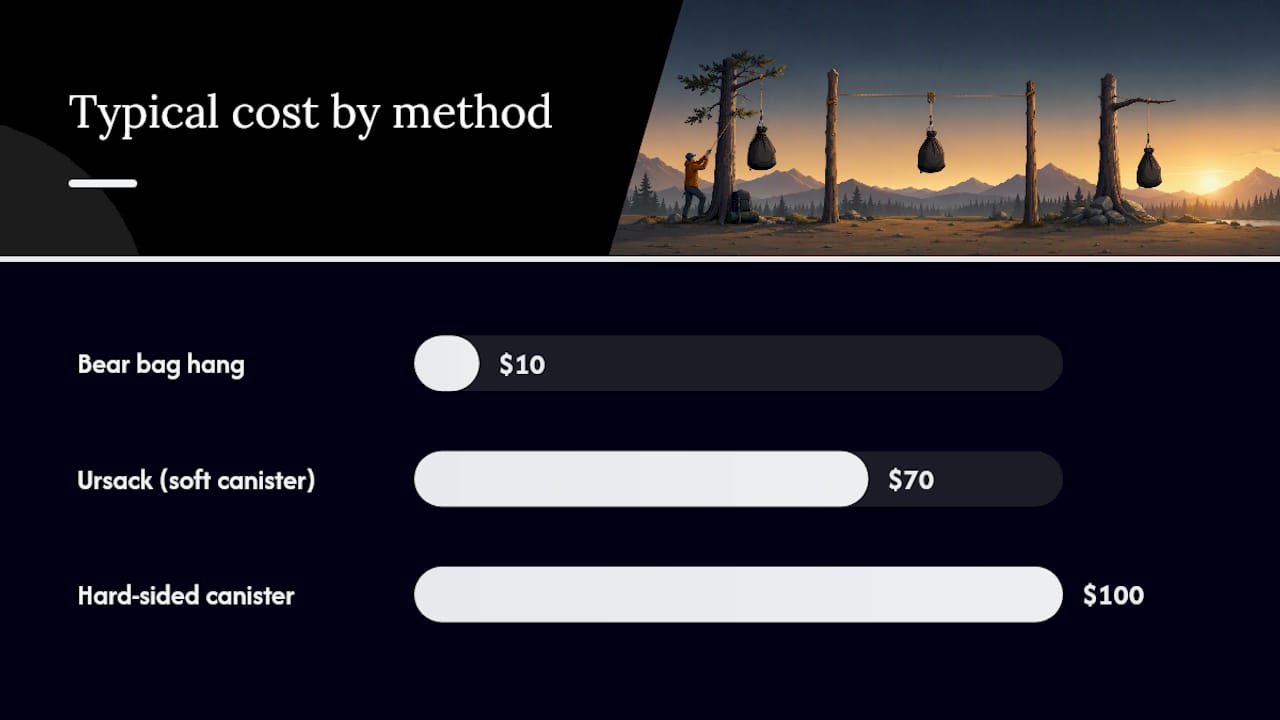
A few things the table doesn’t capture: Ursacks are not accepted everywhere a canister is required, so check the specific regulation before you count on one. Hard canisters are heavy but nearly foolproof, and many parks rent them at the trailhead for a few dollars a day. Some established campsites have bear poles or wires already rigged — Washington Trails Association notes that trail organizations and park pages often list this infrastructure, so check before you pack.
A mixed approach works well on longer routes: carry a canister through known hotspot zones, rely on hangs in benign wooded sections. Park rules always override personal preference.
Essential gear for a reliable bear bag hang
You don’t need much, but what you bring has to work.
Minimum kit:
Throw line: 50–75 feet of 1.5–2mm Dyneema or Spectra cord. Avoid braided fishing line (it tangles) and thick nylon (it drags on bark and is heavy).
Stuff sack or bear bag: A lightweight nylon or Dyneema sack with a cinch top. An Ursack is a valid upgrade.
Throw weight: A small stuff sack filled with rocks, a purpose-made throw bag, or a carabiner clipped to a short loop. Roughly 2–4 oz works for most throws.
Toggle or dog-bone: A short stick or purpose-made toggle to lock the line against the branch so the bag can’t slide back down.
Carabiner: One or two small locking carabiners to clip the bag to the line cleanly.
Optional but useful:
Reflective or brightly colored cord (easier to spot at night)
Lightweight gloves (rough bark tears hands on retrieval)
A pulley or friction ring for heavy loads
Keep the whole kit under 8 oz. Dyneema cord is the biggest upgrade over standard paracord — it’s thinner, stronger, and far less likely to catch on bark mid-throw.
Step-by-step hanging methods: PCT, counterbalance, and two-tree
PCT (single-branch) method
Goal: Bag hangs 10–12 feet off the ground, at least 4 feet from the trunk, on a branch 15–20 feet up.
Find a branch at least 15 feet high and roughly 4–6 inches in diameter at the point where you’ll hang.
Tie your throw weight to one end of the cord. Toss it over the branch, aiming for a point 4+ feet from the trunk.
Once the cord is over the branch, clip your bear bag to the free end with a carabiner.
Hoist the bag up until it’s within a foot of the branch.
Clip a toggle (a short stick or dog-bone) onto the cord just below the branch, so the bag can’t slide back down when you release tension.
Lower the bag slowly until the toggle catches against the branch. The bag should now hang freely, 10–12 feet off the ground.
Tie off the remaining cord to a separate tree or anchor, out of reach.
Common mistakes: throwing too close to the trunk, choosing a branch that dips under load, or skipping the toggle so the bag slowly descends overnight.
Pro Tip: Swing the throw weight in a pendulum arc rather than lobbing it straight up. You get more control and fewer snags.
Counterbalance method
Use this when your load is heavy or you need mechanical advantage. Divide your food into two roughly equal bags. Hoist the first bag as high as possible, then attach the second bag to the cord as high as you can reach and push it up with a stick until both bags hang at equal height, each out of reach from below.
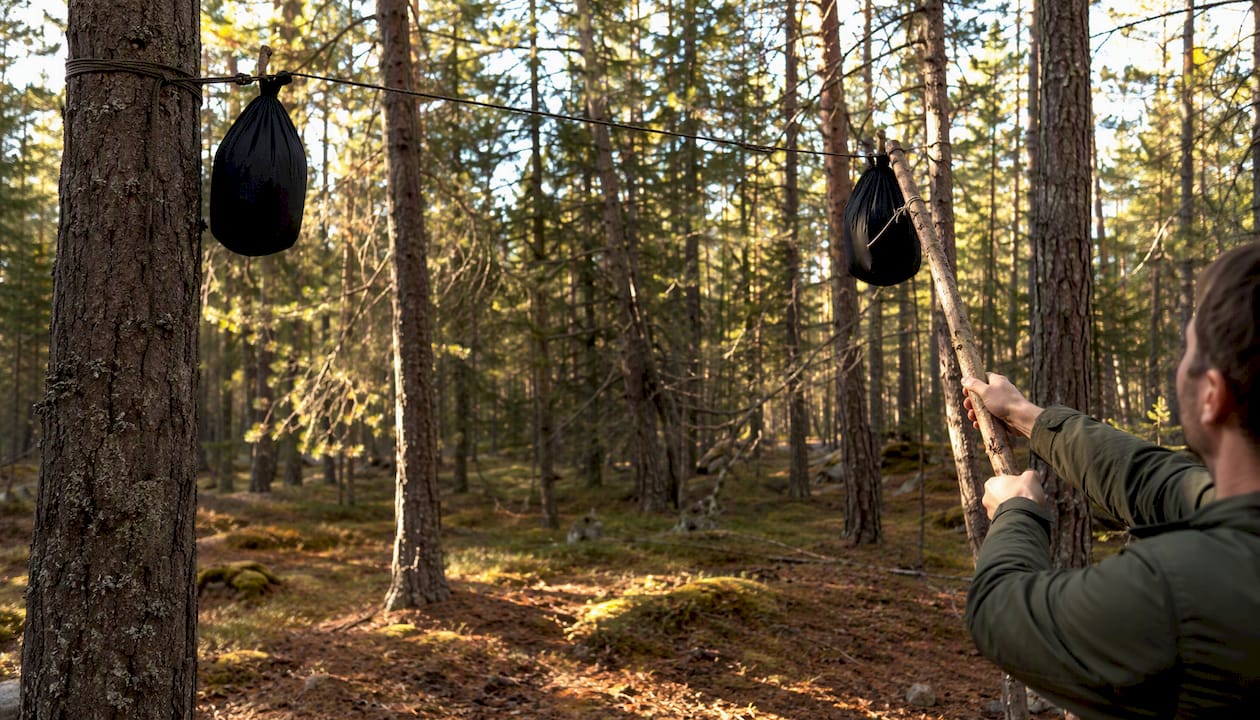
Two-tree method
Goal: Cord strung between two trees, bag hanging at midpoint, at least 10 feet off the ground.
Find two trees 15–20 feet apart with clear space between them.
Throw your cord over a branch on the first tree, then walk the cord to the second tree and throw it over a branch there.
Tie one end to the first tree at ground level.
Clip your bear bag to the midpoint of the cord.
Hoist by pulling the free end until the bag reaches the right height, then tie off.
Backpacker notes that scouting for suitable trees often takes far longer than the actual hang, which is exactly why you scout on arrival, not at bedtime.
Why bear hangs fail and common mistakes to avoid
A hang that looks good from the ground can still fail. Bears are strong climbers and surprisingly patient problem-solvers.
Most common failure modes:
Bag hung too low (under 10 feet) — a standing bear can reach it
Cord too close to the trunk — bears climb to the branch and walk out
Bag tied directly to the drawstring — the string breaks under a bear’s weight and the bag drops
Rope dragging on rough bark — friction prevents a clean hoist, and the bag ends up at the wrong height
Hanging directly above the tent — a falling bag (or a bear in the tree) lands on you
Red flags when scouting:
Dead or cracked limbs (they snap under load)
Branches under 4 inches thick at the hang point
Lower branches within 10 feet of the bag that a bear can use as a ladder
Branches that slope sharply downward toward the trunk
Before you sleep, do a quick verification: shake the cord to confirm the toggle is seated, check that the bag swings freely without touching anything, and confirm the rope’s ground anchor is out of a bear’s reach. A bear that can grab the anchor rope can lower your bag.
Practice drills and expert tips to build reliable hang skills
The gap between knowing the PCT method and executing it in the dark on tired legs is significant. Leave No Trace recommends practicing before you rely on the technique in the field.
A simple practice sequence:
Find a tree in your backyard or a local park with a branch 15+ feet up
Load your bear bag to trip weight and practice the full PCT sequence, start to finish
Time yourself. Aim for under 8 minutes
Try it once at dusk to simulate low-light conditions
Practice your throw from different angles — not every branch is perfectly positioned
At camp, build these habits:
Scout for hang trees when you arrive, not after dinner
Pick two candidate trees in case your first choice doesn’t work out
Pre-rig your throw line before dark so you’re only hoisting when it’s time
Hang before you cook, not after — you’re less tired and there’s more light
Pro Tip: Dry your cord after wet trips and store it loosely coiled, not tightly wound. A cord with memory kinks throws poorly and tangles at the worst moment.
What to do if a bear gets to your food
Stay calm and stay back. Do not run toward the bear or try to retrieve your food while the animal is present.
Move everyone in your group away from the food storage area quietly. Keep together.
Make noise from a safe distance to encourage the bear to leave — don’t approach.
Once the bear has moved off, secure any remaining food and scented items immediately.
Document the incident: time, location, bear description, and what was taken or disturbed.
Report to the nearest ranger station or park staff as soon as it’s safe to do so.
NPS bear safety guidance stresses that responses differ between black bears and grizzlies. With black bears, making yourself look large and making noise is generally appropriate. With grizzlies, the calculus changes — playing dead in a defensive attack is the recommended response, and EPA-approved bear spray is your most effective deterrent when allowed. Never use improvised repellents.
Do not attempt to retrieve food from a bear that is still present. A meal is not worth a mauling. If you encounter a bear, Thrillofit’s guide on bear encounters in the wild covers the full response protocol.
Before you sleep: a quick food storage checklist
Run through this before you zip up the tent:
[ ] Bear bag is at least 10–12 feet off the ground
[ ] Bag hangs 4+ feet from the nearest trunk and branch
[ ] Toggle is seated; bag swings freely without touching anything
[ ] Bag is NOT tied to its own drawstring (use a carabiner)
[ ] All food, trash, and scented items (toothpaste, sunscreen, lip balm) are in the bag
[ ] Cooking gear with food residue is stored or cleaned — see campfire cooking hacks for reducing food smells
[ ] Ground anchor rope is secured out of reach
[ ] Bear spray is accessible at your sleeping location
[ ] If no suitable tree exists: food is in a canister or stored 300+ feet from camp per land-manager rules
If you’re unsure whether your hang meets the standard, use the canister. The checklist is a verification tool, not a substitute for a good hang.
What actually goes in the bear bag
Everything with a scent. That’s a broader category than most beginners expect.
Always store in the bear bag:
All food, including sealed packages and energy bars
Trash and food wrappers
Cooking pots and utensils with food residue
Stove fuel canisters (bears have been known to chew them)
Toothpaste, floss, and mouthwash
Sunscreen, lip balm, insect repellent
Feminine hygiene products
What can stay in camp:
Clean, unscented clothing (worn only for sleeping, not cooking)
Trekking poles and tent stakes
Sleeping bags and pads, provided they have no food contact
The rule of thumb: if it has a smell a bear might investigate, it goes in the bag. Deciding what to pack on a trip affects how much you’re storing — Thrillofit’s guide on why to bring extra food hiking covers food planning in detail.
How to pick the right tree and branch
The tree selection step is where most hangs succeed or fail before the rope ever leaves your hand.
What you’re looking for:
A living hardwood (oak, maple, beech) with a branch 15–20 feet off the ground. Conifers work but their branches tend to be weaker and more resinous.
A branch at least 4 inches in diameter at the point where the cord will sit, tapering to thinner at the tip — this keeps the cord from sliding toward the trunk.
At least 4 feet of clear space between the hang point and the trunk, and no lower branches within 10 feet of where the bag will hang.
No dead wood, cracks, or obvious rot. Bounce a rock off the branch to test — a hollow thud suggests decay.
Dead trees and softwood snags fail under load. A branch that looks solid from the ground can be punky inside. When in doubt, find a different tree.
Minimizing your impact when choosing a hang location
The hang location matters beyond just bear deterrence. Repeated use of the same tree damages bark and compacts soil around the roots.
Choose a tree at least 200 feet from your tent and 200 feet from water sources
Avoid throwing your cord over the same branch repeatedly — rotate trees across nights if you’re at a multi-night site
Don’t break branches to create a better hang point; find a tree that already works
Stay off fragile vegetation when positioning yourself for a throw
Avoid hanging near established trails where the setup creates a hazard for other hikers
Washington Trails Association notes that many established campsites already have bear poles or wires — use them when available. They’re designed for repeated use and eliminate the vegetation impact entirely.
Black bears vs. grizzlies: how bear species changes your strategy
The species of bear in your area should directly shape your storage method.
Black bears are excellent climbers and opportunistic. A well-executed PCT hang in good trees is generally effective against them. They’re the primary target of bear bagging technique, and most U.S. backcountry outside the Northern Rockies and Alaska is black bear territory.
Grizzly bears (brown bears) are larger, stronger, and in many areas smarter about food sources. They’re also less common in treed terrain where hangs are practical. NPS guidance treats grizzly encounters differently from black bear encounters — the behavioral responses diverge significantly. In grizzly country (Greater Yellowstone, Glacier, Alaska), most land managers and experienced guides recommend hard-sided canisters as the baseline, not a hang. The combination of grizzly strength and the frequent absence of suitable hang trees in alpine and tundra terrain makes the hang a poor primary choice.
In mixed-species areas, default to the more conservative method. If grizzlies are present, use a canister.
Keeping the bear bag safe from rodents and raccoons
Bears get the headlines, but rodents and raccoons cause a significant share of food losses in the backcountry.
Mice and squirrels can chew through nylon stuff sacks and even some Ursack-style bags if given enough time. Raccoons are capable climbers and dexterous enough to work a poorly secured knot. A few adjustments close most of these gaps:
Use a bag made of Dyneema or Spectra rather than standard nylon — harder to chew through
Keep the bag off the ground entirely; rodents will find it if it’s resting on anything
Avoid hanging near dense brush where squirrels can launch from adjacent vegetation
An Ursack AllMitey (rated for both bears and rodents) addresses both threats in one package
Inspect the cord and bag for chew marks each morning — a compromised bag needs replacing before the next hang
Raccoons are most active at lower elevations and near water. If you’re camping near a lake or river at a popular site, treat raccoon risk the same way you treat bear risk: everything scented goes up.
The case for conservative choices in the backcountry
Bear bagging is a skill worth learning. It’s light, flexible, and works well across a wide range of wooded terrain. But the honest truth is that a good hang requires the right trees, the right cord, and enough practice to execute it reliably when you’re tired and it’s getting dark.
The backpacking community sometimes treats canisters as the lazy option. I’d push back on that. A canister is a canister — you put food in, you close the lid, you set it 200 feet from camp. There’s no technique to master, no branch to find, no toggle to seat correctly. In areas where bears are habituated or trees are scarce, the canister isn’t a concession. It’s the smarter call.
My recommendation: learn the PCT hang and practice it until it’s automatic. Then use it where it’s appropriate and legal. In grizzly country, in parks that require canisters, or anywhere you can’t find a suitable tree by the time dinner is done — use the canister without hesitation. The goal is keeping food away from bears, not proving you can hang a bag.
For broader safety and preparedness content, Thrillofit’s survival category covers wilderness safety from multiple angles.
Sources
For wildlife encounter protocols and broader backcountry safety, Thrillofit’s wildlife encounter guidelines are a solid next read.
Recommended
Comments